| OBJECTIVES TUTORIAL AUTHOR: KENGO DATE: 05/02/02 |
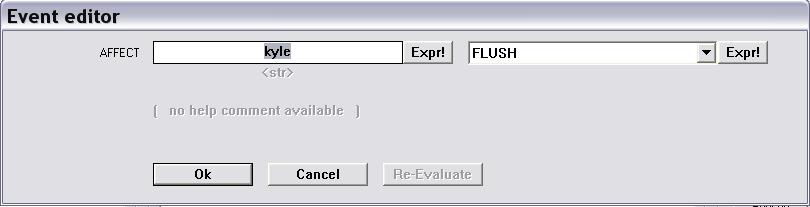
| Note: Before using this tutorial, I suggest you read the first 3 camera tutorials if you haven't already to familiarise yourself with using BehavEd and saving scripts. First of all, open up the assets1 pk3 file in the base folder of Jedi Knight 2. Set path in alphabetical order, then look for the extension 'strip' in the path section. Then look fo rthe objectives.sp file. Extract it to the desktop, a folder called 'strip' will appear on the desktop, and the file objectives.sp will be in the folder. You can open the folder using notepad. Now first up we have to change some of the entries. Go to ARTUS_MINE_OBJ1, which is below INDEX5. Change the entry after TEXT_LANGUAGE1 to "Find the hidden plans". Change the entry at ARTUS_MINE_OBJ2, TEXT_LANGUAGE1, to "Escape the base". Text language 1 is English. Text language 2 is French, Text language 3 is German. You could translate your entry to the other two languages and enter these if you want, that's down to you. Below is what the objectives.sp file should look like once altered. Now go to file - then save as. In the file name area type objectives.sp In the save as type section, save the file as All files You should get an error message asking if you want to overwrite the current objectives.sp file, go to yes. If you haven't read the tutorial on SP PK3s and created the SPMod folder yet, then go there before reading on. Now copy the strip folder with the altered objectives.sp inside to the SPMod folder Load up Packscape, load the SPMod PK3, copy all the folders in the SPMod folder (but don't copy the SPMod PK3 already there into the SPMod pk3), then save it to the SPMod folder again This has basically updated the pk3 so that the altered strip folder is now in it. Now you need to load up Radiant. Create a basic map, remembering to put an info_player_start and a few lights in. Now create a trigger_once with a link to a target scriptrunner as described in Camera tutorial 2. Just as a reminder, here is an excert from that tutorial on triggering scripts: To trigger scripts, we need a trigger in Radiant. These triggers should fire a target_scriptrunner. Create a trigger (remember to give it the trigger texture so it isn't solid in-game, make it a trigger_once. Create a target_scriptrunner. Now select the trigger, then the target_scriptrunner. Press Control-K, this will link the two entities (it is important to select the trigger first and the target second as that will create the direction of the link between the two ie the trigger fires the target.) For the tager_scriptrunner set: Key: Usescript Value: map/objectives1 Go to the scripts folder, which is in the base folder of the JK2 directory. In the scripts folder, create another folder called map. We will use two folders in the script folder, cin will be for cutscenes, map for all non-cutscene related scripting. Now create another trigger_once in a different area of the basic map, make it further from the player so he will reach it after first going through the other trigger and make sure it isn't touching or overlapping the other trigger at all. Now link this to another target_scriptrunner. In this target_scriptrunner, enter: Key: Usescript Value: map/objectives2 Now save and compile the map. For this tutorial we'll call it objectivesmap1 Now start up BehavEd Create a new script, save it as objectives 1, in the map folder - which is in the scripts folder Create an affect command in the Script Flow area. Double click on it and in the left box enter kyle. Go to OK. This will set the script as affecting the player, as Kyle is the scripting name for the player. Now create a set command that goes from the affect command, to do this drag it onto the affect command. Double click on the set command. In the left box, look through the options until you get to SET_OBJECTIVE_SHOW, then select this. Now press the Re-Evaluate button. The names of all the objectives from the objectives.sp file will now appear in the right box. Look through the names of the objectives until you get to ARTUS_MINE_OBJ1, then select it. Save the script again and compile it. Now create a new script called objectives2, and again save it in the map folder Create an affect command that affects Kyle as before. Again have a set command leading from the affect command. This time scroll through the options in the left box of the set command event editor, and select SET_OBJECTIVE_SUCCEEDED Re-Evaluate, then select the ARTUS_MINE_OBJ1 objective in the right hand box. Now create another set command leading from the affect command. Make it SET_OBJECTIVE_SHOW then select ARTUS_MINE_OBJ2 Save the script again and compile it. Now we need to put all the elemtens into the pk3. The strip folder is already there. Go to base>maps and get the map BSP for objectivemap1 and copy it to first the SPMod folder, then the pk3, then go to base>scripts and copy the whole script folder first to the SPMod folder then to the pk3, overwriting if neccesary. Now save the pk3 as SPMod in the SPMod folder. Now start up JK2, go to mods and load up SPMod. Type devmap objectivemap1 in the console and the map should load. What should happen: When you reach where the first trigger is, you should get an 'Objectives updated' note on the screen. Go to the objectives screen and 'Find the hidden plans' should be listed. Now move to where there second trigger is,and again an 'Objectives updated' note should appear on the screen. The 'Find the hidden plans' objective should be ticked as being complete, and a new objective 'Escape the base' should be listed as well. |
 |
 |
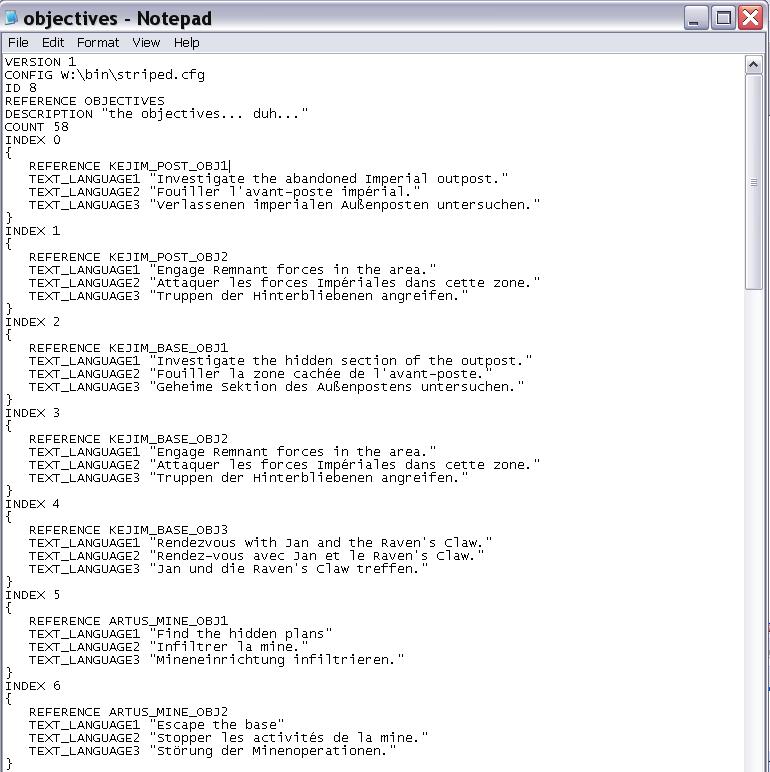 |
| Altered line |
| <------------------ |
| Altered line |
| <------------------ |
 |
| A lot of credit for this tutorial goes to Darth Arth, whose Return to Jedi Valley pk3 I scavenged to find out where the objectives.sp folder was and what you did with it! Credit also to JK2 Mapping by 007 for giving me my first insight into how you do scripting with BehavEd |